R is a free, open-source programming language for statistical analysis and graphics. RStudio is a free, open-source IDE(integrated development environment) for R and provides a convenient interface of R programming by incorporating many features such as data viewer, full-featured text editor, workspace browser, graphical tools and R help.
Installing R and RStudio
Both R and RStudio are available for Windows, MacOS, and Linux. But make sure that you must install R before installing RStudio.
Installing R
- Go to https://cloud.r-project.org.
- You will see three links for downloading R which correspond to each OS(operating system). Click on the link that supports your OS.
For Windows
- After clicking on “Download R for Windows”, choose base among Subdirectories.
- Then, click on “Download R 4.5.2 for Windows”(the latest version in February 2026).
- It will start downloading “R-4.5.2-win.exe”. After downloading it, run this file, which will guide you to install R. Leave all default settings in the installation option.
For Mac OS
- After clicking on “Download R for (Mac) OS X”, If you are using Apple sillicon Mac (M1 and higher), click on R-4.5.2-arm64.pkg (the latest version in February 2026). if you are using Intel Mac, click on “R-4.5.2-x86_64.pkg”.
- Run the downloaded file, which will guide you to install R. Leave all default settings in the installation option.
- Also, go to https://www.xquartz.org. Download “XQuartz-2.8.5.pkg”(the latest version in February 2025). Install this pkg file. If you do not install it, you will not be able to use some packages (e.g., summarytools).
Installing RStudio
- Go to https://rstudio.com/products/rstudio/download/.
- Scroll down and find a section of “All Installers and Tarballs” (See Figure 1).
- Choose an installer that supports your OS. For Window, click on RSTUDIO-2026.01.1-403.EXE. For MacOS, click on “RSTUDIO-2026.01.1-563.DMG.
- Install the downloaded file. Choose default installation options.
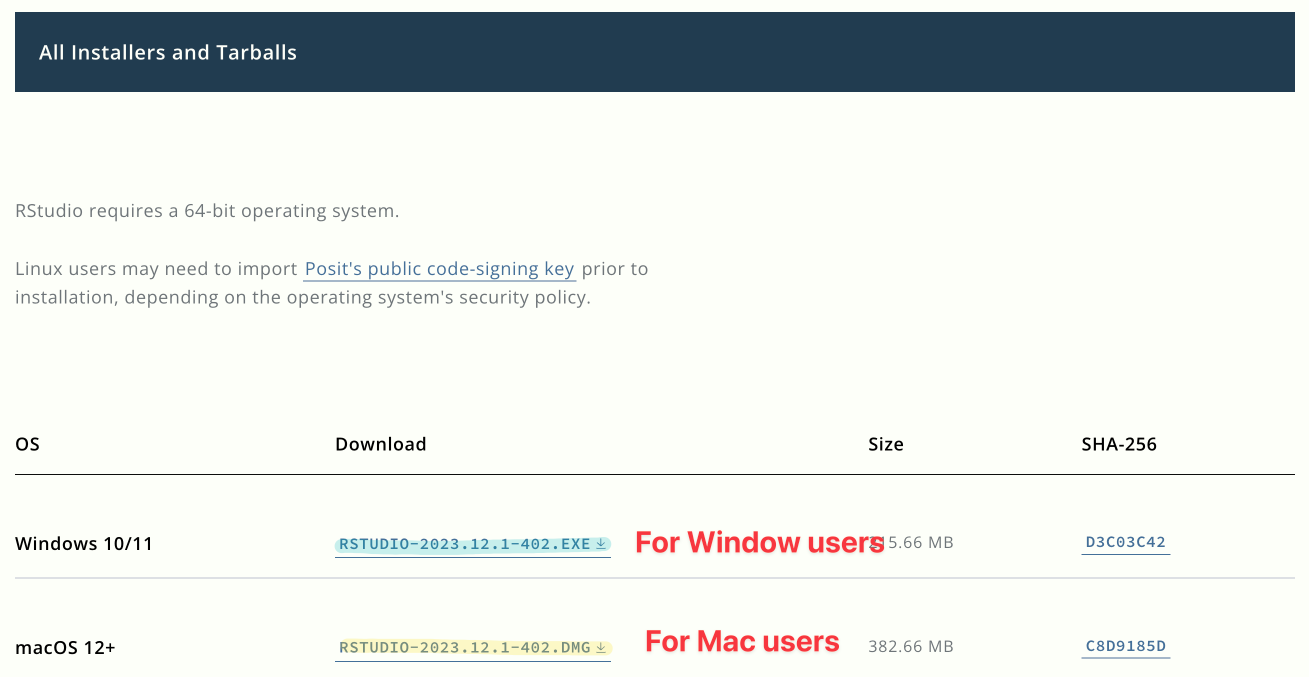
Figure 1: Download RStudio
If you want to use R and RStudio on your iPad or Chromebook,
If you do not have a computer on which to install R and RStudio, but want to use them on your iPad or Chromebook, Posit Cloud may be the solution. Posit Cloud is hosted by the company that provides RStudio and allows you to run R and RStudio over the web. But setting up this service is a bit tricky. Go to the website, sign up, and try to set up the service. It will not be easy. If you have a problem, contact the unit convenor. They will be happy to help you set up the service.
Customising RStudio
Once the installation is completed, the next step is to start RStudio. When you open RStudio the first time, you will see a window consisting of three panes (See Figure 2).
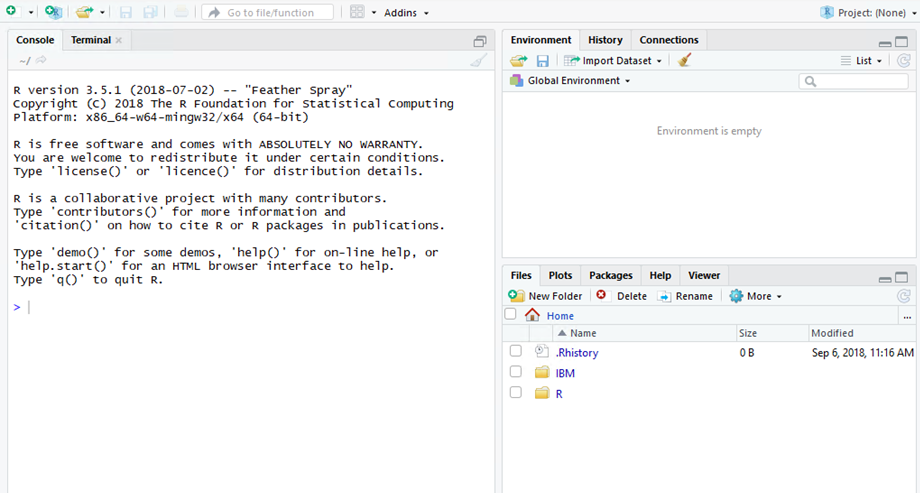
Figure 2: First Look of RStudio
However, this default look of RStudio does not include an important pane where you spend most time during your statistical projects. It is the pane in which you write and save your R codes. To add this pane, click on the first icon with a green plus sign, and then choose “R Script” (See Figure 3).
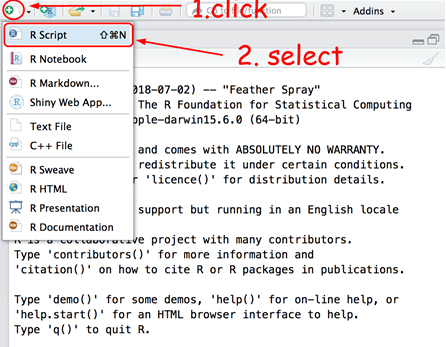
Figure 3: Adding R Text Editor
Then, you will see a new pane in the RStudio (See Figure 4).
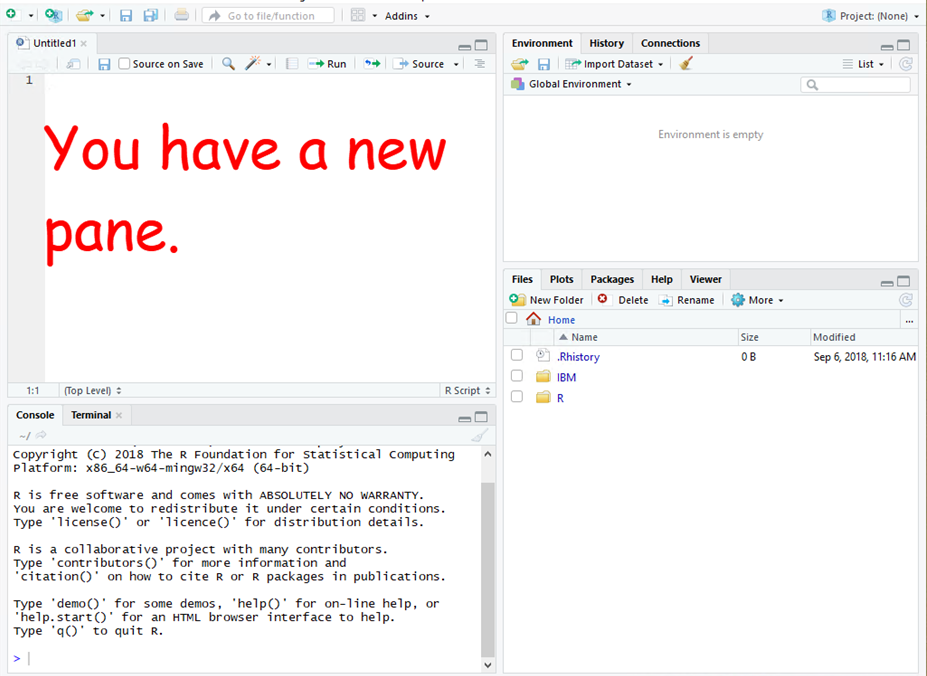
Figure 4: New RStudio Look
Next, I would like to introduce RStudio customisation tips which could make your R programming much easier. To customise RStudio (See Figure 5),
Go to Tools in the top menu, and then click on “Global Options…”. (This is the same for PC and Mac)
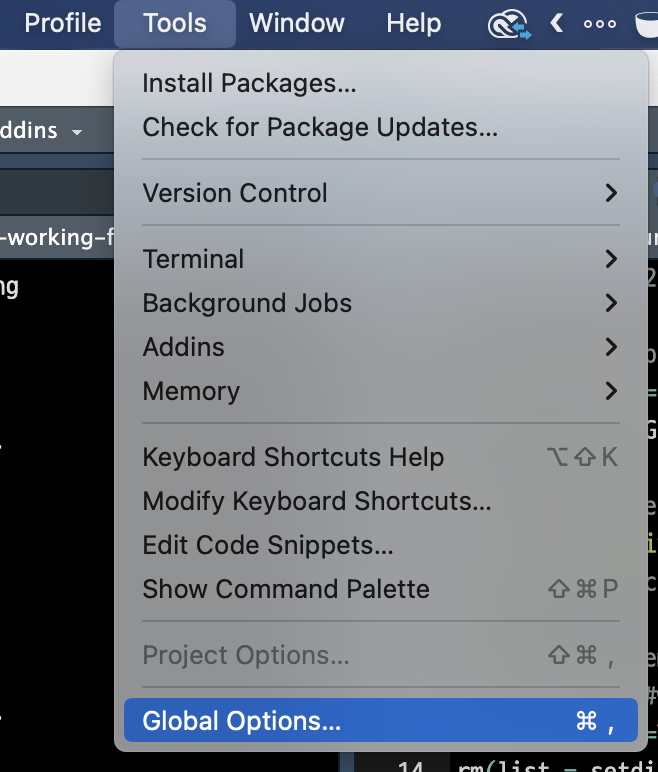
Figure 5: New RStudio Look
Setting your default working directory
A default working directory is a folder in which R saves all the files unless you specify another file location. Also, R always opens files from the default working directory. For this reason, it would be convenient to save your files in your default working directory. Otherwise, you may have to type a long file location every time you try to open them.
You can set or change the default working directory by the following steps. In the section of General (of Options window), click on “Browse…” under “Default working directory (when not in a project):” (See Figure 6). It will open a file navigation window.
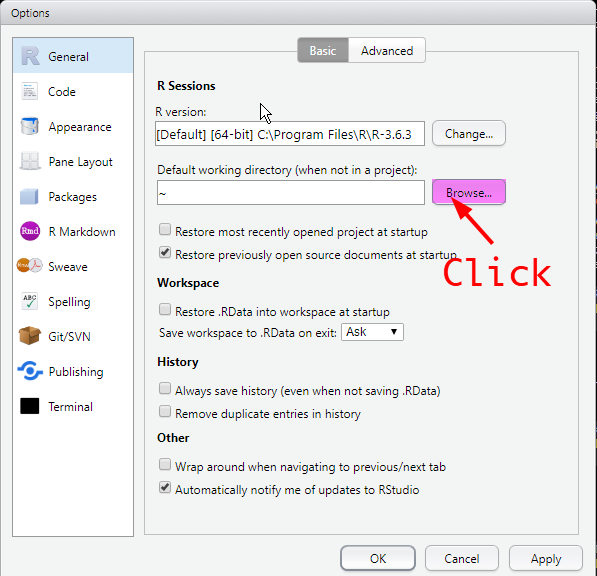
Figure 6: Default Working Directory
For Windows
- Click New Folder (See Figure 7).
- Type “r-working”, then hit Enter. It will set the name of new folder as “r-working”.
- Doubl-click the “r-working” folder that you just made.
- Click Open at the bottom.

Figure 7: Making a Working Directory for Windows (1)
For Mac OS
- Make sure that your home directory should be highlighted (See Figure 8).
- Click New Folder at the bottom.
- Type “r-working” as the name of new folder.
- Click Create.
- Make sure that your home directory and “r-working” folder are highlighted (See Figure 9).
- Click Open at the bottom.
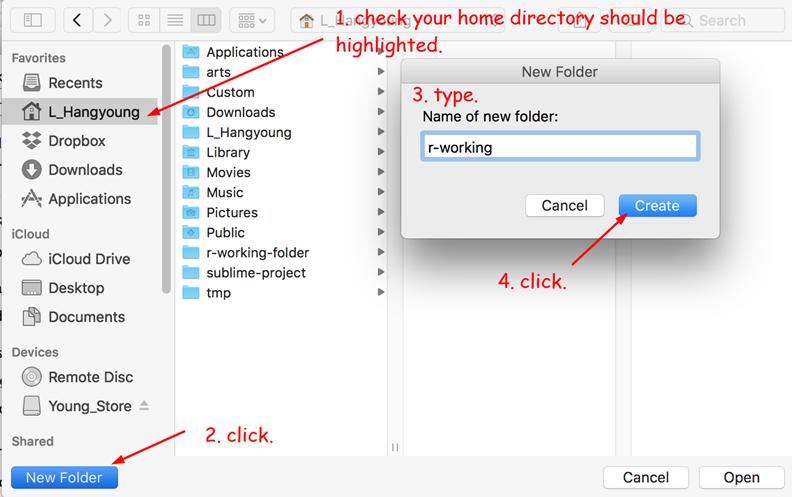
Figure 8: Making a Working Directory for Mac (1)
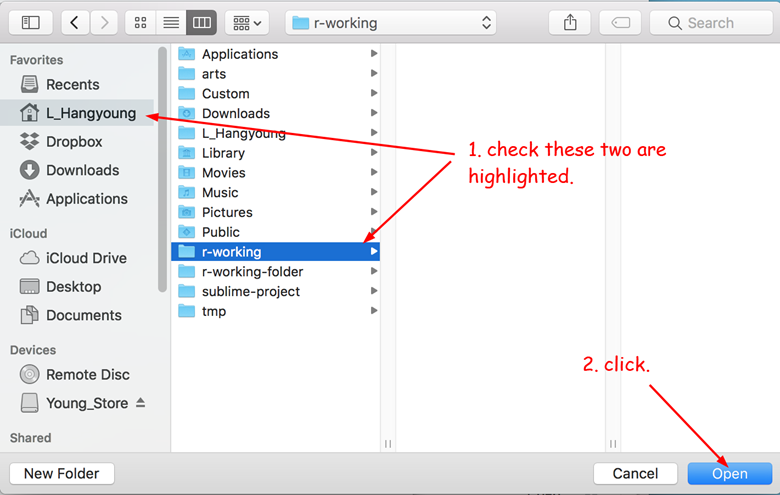
Figure 9: Making a Working Directory for Mac (2)
If you follow the steps correctly, you will see “~/r-working” is set as your default working directory.
Of course, you can choose any other folders as your working directory.
Nonetheless, you need to save your R-related files in this working directory. Thus, remember the location of this working folder.
Automatically loading your previous R codes
In the section of General, find “Restore previously open source documents at startup” and tick the box of it (See Figure 10). This allows RStudio to open automatically R files on which you have worked. Thus, you can always start with your currently working R files.
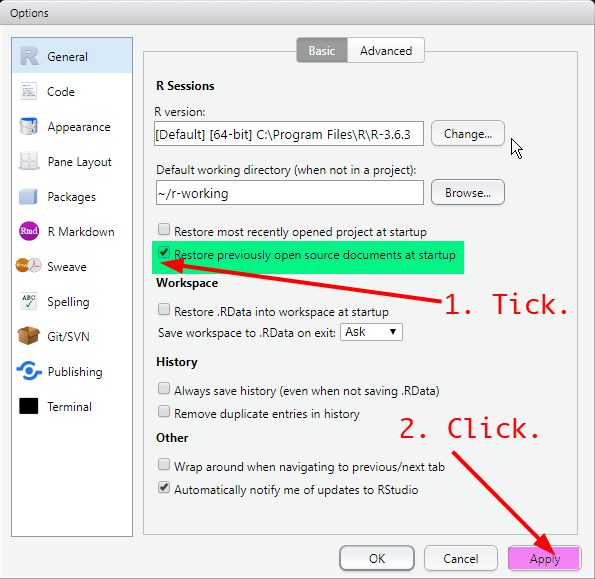
Figure 10: Working with Your Previous R Codes
Tip: Every time you make changes in RStudio options, do not forget to click on Apply on the bottom. This will save all the changes you made.
Setting automatic line wrap
Sometimes you may write a very long line of codes, which requires you to move a horizontal scroll bar to read them all. This is annoying. Setting automatic line wrap would be a good choice to avoid this inconvenience.
In the section of Code (in the left) and the tab of Editing (in the top), find “Soft-wrap R source files” and tick the box of it (See Figure 11). Then, click the tab of Saving (in the top) and tick “Always save R scripts before sourcing” (See Figure 12). Then, click Apply at the bottom.
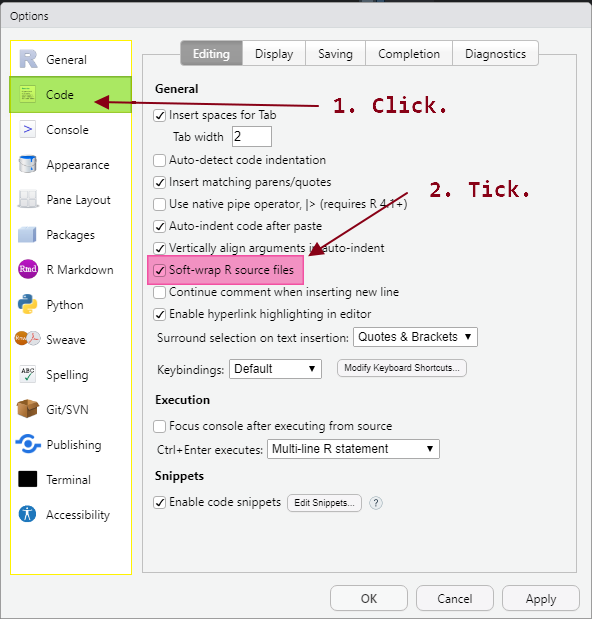
Figure 11: Soft Line Wrap
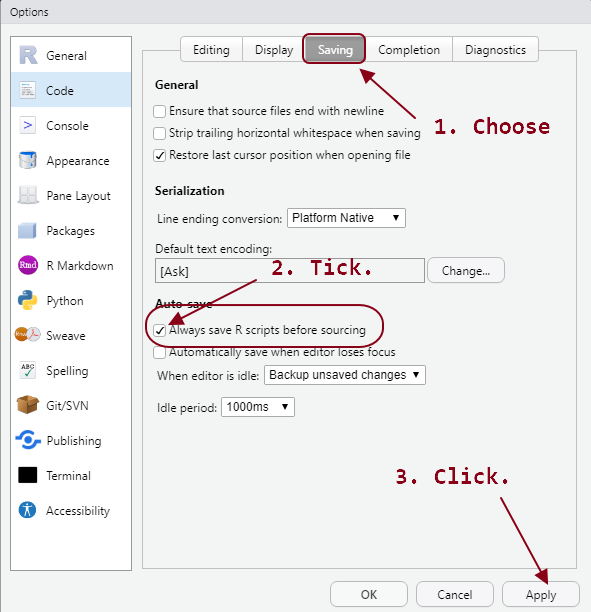
Figure 12: Automatic Saving of R Scripts
Customising the look of RStudio
You can change font family, font size, and the look of RStudio in the section of Appearance (See Figure 13).
- RStudio theme: RStudio provides support for two global themes that customize RStudio’s user interface: Modern and Sky. By default, the Modern theme is selected.
- Editor font: Choose a font for panes which display code (Console, Source, History, and Workspace). I recommend
Consolasfor Windows andMenlofor Mac. - Font size: Set the font size (in points) for panes which display code (Console, Source, History, and Workspace)
- Editor theme: Specify the visual theme for the Console and Source panes. You can preview the theme using the inline preview or by pressing the Apply button.
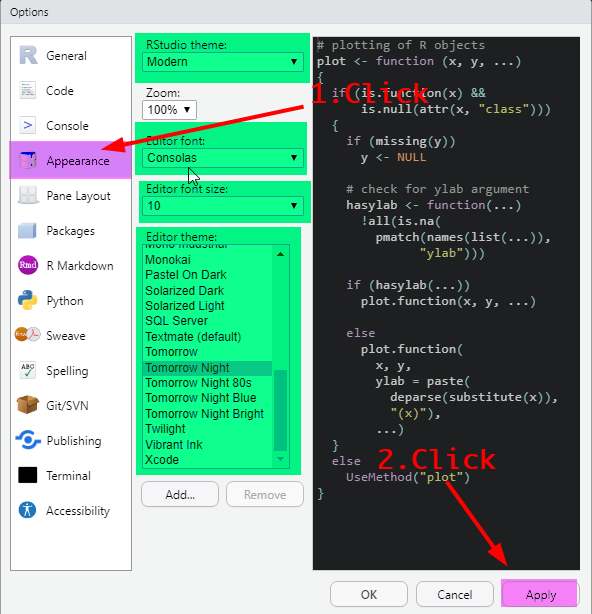
Figure 13: Customising Appearance
Configuring panes
You can change the layout of four RStudio panes in the section of “Pane Layout”. Figure 14 shows how I configured the four panes.
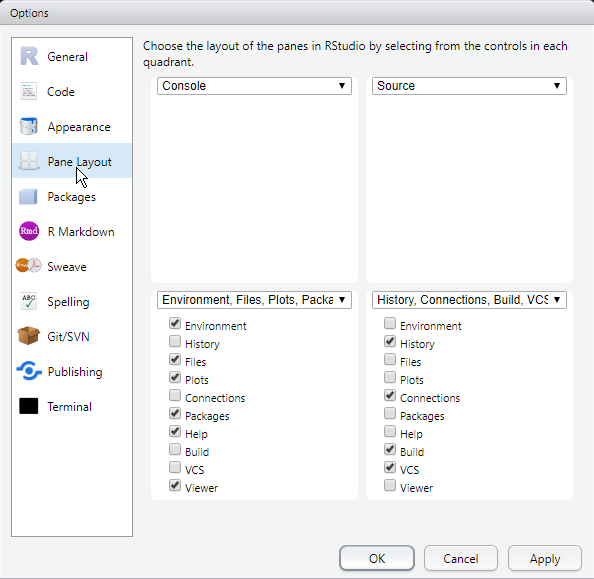
Figure 14: Configuring Panes
- Console is a command window. Here you can type any valid R command after the > prompt followed by hitting Enter and R will execute that command.
- Source is a text editor. It is where you edit and save your R codes.
- Bottom left pane includes Environment, Files, Plots, Packages, Help and Viewer. Here you can check datasets, open files, view graphical outcomes, install and load packages, access R help documents, and view markdown and html documents.
- Bottom right pane includes History, Connections, Build and VCS. History shows all R commands that were executed in the Console.
Click on OK at the bottom. Then, you will see newly configured panes (See Figure 15).
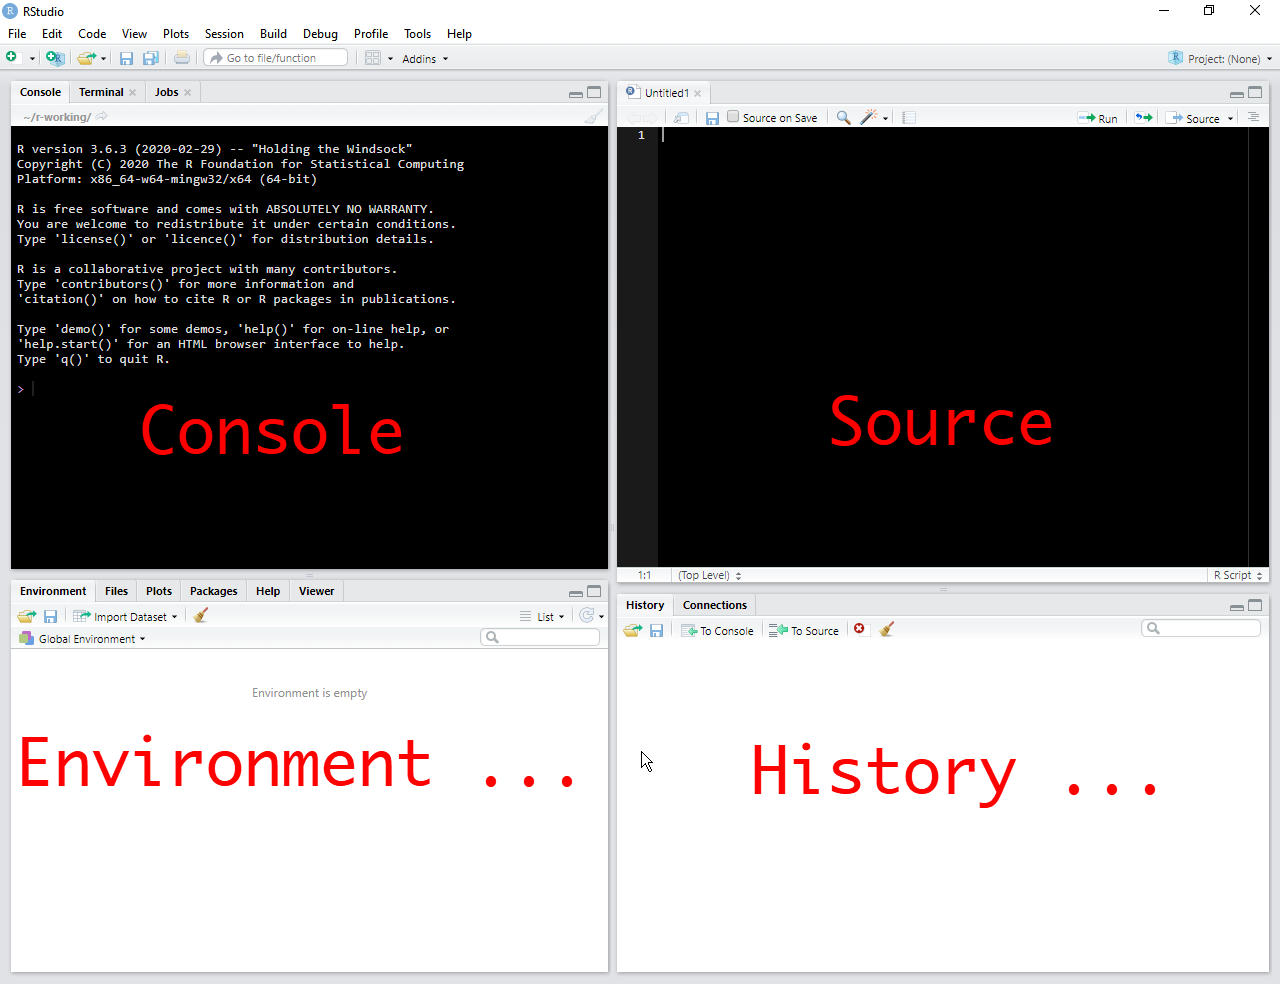
Figure 15: Configuring Panes
Lab 1 Participation Activity |
If you say “No” to any of the three questions, please contact the unit convenor by email. He will help you to fix the problem. Note: Please complete the Lab 1 Participation Activity. You can find the link to this activity on iLearn. This activity will contribute to your participation marks. |